
I just love when a simple craft turns out fabulously. Then I can not help but to see it’s possibilites everywhere!
That’s just what Holly from The Dandy Byrd did with these adorable mason jars she whipped up for a baby shower for a dear friend and she’s sharing them with us today!
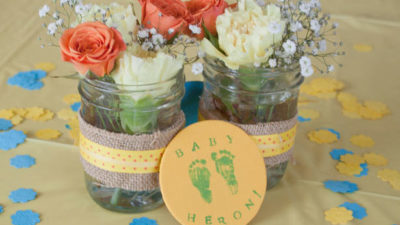
To make your own mason jar and burlap flower vases you’ll need:
- small mason jars (approx. 16 oz)
- burlap ribbon
- your favorite ribbon — two widths in coordinating colors
- glue gun
So simple to assemble, here’s how:
- cut the burlap ribbon (2 inches’ in width)
- wrap it around each jar and glued at the back, overlapping slightly, as to not show any of the jar underneath
- repeat with the larger ribbon (1 inch in width) and the tiny ribbon is wrapped around and tied in a bow at the front of the jar
You could also use the mason jars for your beverages like Holly did for her baby shower. She added a safety pin and a coordinating paper straw with ribbon flag and it was adorable! Plus, after the party is over the hot glue pops right off the jars and they’re ready for your next party!

Notice the sweet wooden stamped circles that accent the jars…yep, Holly created those, too!
She’s a real whiz, but you can create these for yourself, you’ll need:
- wooden circles small and large
- paint (colors of your choice, Holly used 3 colors)
- stamp pad
- small set of letter stamps
- baby feet and hand stamps
And here’s how:
- paint each wooden circle (she used alternating colors),
- let them dry for about 5-10 minutes,
- stamp a phrase on each one, along with either a set of feet or hands (Holly advises using black, since it worked best for her), and
- it’s important you press down firmly with the stamps, because they will fade slightly, absorbing into the wood
A big thanks to Holly of The Dandy Byrd for sharing and as always, we hope you’re inspired to craft, bake and create!
Join The Celebration Shoppe on facebook, sign-up for the daily ideas to come right to your inbox (a box in the right-side navigation bar), follow us on twitter, pinterest and on instagram at @thecelebrationshoppe
 camp cupcakes ~ skunk tails