
My darling friend Kelly at The Party Dress asked a few of us to participate in a holiday series on her blog this month. We could style a dessert table, a dinner table or a child’s table. Since my 2010 Christmas collections, Mod Candy Cane and BELIEVE, were already styled and in the shoppe, Kelly let me bend the rules a bit. I worked with the two most important (shorter than 4 feet) men in my life to style Santa’s cookie placesetting for Christmas Eve. For the most part I let them lead and they chose a woodland theme with the initial inspiration coming from a huge pine cone they had been dying to decorate like a Christmas tree.
More to come on the placesetting, but for now I want to share the DIY pom pom Rudolph-the-red-nosed-reindeer craft we came up with. I’m just in love with him! I was inspired by Jenn at HWTM and her recent use of yarn in several Christmas crafts. Here’s what you’ll need:
- brown yarn for the body and neck
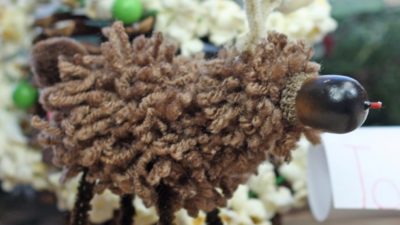
- large acorn for the reindeer’s face/snout
- 4 dark brown pipe cleaners for the legs
- 2 light brown pipe cleaners for the antlers
- small brown pom pom for the tail
- red paint for the tip of his nose
- glue gun
- sharp scissors

And here’s how you make him:
-
You’ll need two medium size pom poms for the body. Wrap the yarn around your hand (just below the knuckle) 45 to 50 times, cut and tie in the center as shown in image A. You’ll need two small pom poms for the neck. Wrap the yarn around two fingers (above the knuckle) 45 to 50 times, cut and tie in the center.
-
Cut all the loops in each of your pom poms. You may need to shape them a bit, clipping off any stray strands and condensing his body a bit as shown in image B.
-
For the antlers, cut a pipe cleaner in half and form a “V” with one piece. Next cut the remaining piece in half and twist them around each side of the “V” as shown in image C.
-
For the legs, you can twist the pipe cleaners to give the legs more dimension as we did as shown in image D, or you can leave them straight.
-
Now it’s time to hot glue. Start by gluing the two medium size pom poms together for the body and then add the tail.
-
Glue the two small pom poms together for the neck and glue the acorn on as the snout with the point out.
-
Attach the neck to the body (at about 10 o’clock on the body pom poms) so that the head is up. You may need a few dots of glue at the back of the neck to the body (easily hidden) if your acorn is heavy.
-
Attach the legs.
-
And finally paint the tip of the acorn red.
As always, I hope you’re inspired!
 no-bake but must-make cookies