
As I mentioned in the part I scientist party post, my son loves science (I mean check out that face!) and he spends a lot of time reading (or having me read) science books. So when it came time to pick experiments he already had some ideas about what he wanted to do. I did have to remind him that we would have to have supplies times 10, so in the end we compromised. We chose three experiments for the kids and a grand finale.

But before we get into the experiments, let me set the stage by giving you a tour of our laboratory. The kid’s were greeted at the gate by a “Scan to Enter” sign that my son felt was a must, especially since this is a top secret area!

As they rounded the corner, the pergola was labeled with a large LAB banner,

and nestled underneath were two long tables covered in green tablecloths and topped with all the supplies needed to complete our experiments.

Each child’s experiment station was anchored by a sheet of solid orange scrapbook cardstock with an experiment card to the left and topped with a placecard from our new science birthday party supplies collection.

Here’s a better look at the placecard tied to a test tube filled with candies!

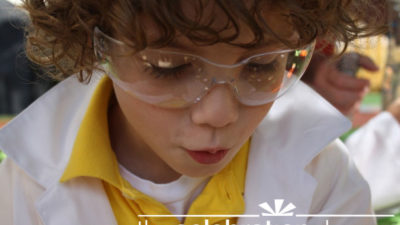
But before the kids could enter, they had to gear up with monogrammed lab coats (available through our partner at Sew Jewell). Alex wanted his to have this cute little worm performing an experiment on his pocket, as well as the bubbling test tubes coming out of the pocket, like all of his guests.

The kids also received goggles embellished with the collection’s “Thanks for bubbling over!” favor tags.

Now on to the experiments. First I have to tell you that one of the best decisions I made while planning this party was to recruit two of my best girlfriends, Tammy and Maura. Maura is a fabulous blogger at 36×37 (and not just because she wrote about me; her perception of me is heavily clouded by our friendship!) and a corporate editor and Tammy is an entrepreneur and a TEACHER. That’s right, I pulled out the big guns!
I organized the lab into two tables, big kids (5-6 year olds plus little brother) and little kids (3-4 year olds). Maura took on helping to keep the little ones focused while Tammy taught the big kids. That’s right, I said taught. She totally wowed me. She came prepared with a little lesson for each experiment: primary colors, weather and buoyancy. She kept them completely engaged the entire time and it was obvious that the kids were really enjoying themselves. Not only did I have a professional actually teaching the kids something, I was able to sit back with the other parents and enjoy watching the little light bulbs go off over their heads. It was wonderful! (Thank you ladies both again!)

For the first experiment, the primary color test, we set up six cups (short clear plastic cups, $2.50 for 40 from Kroger) per child, three empty and three filled 1/3 way with water. Then we dropped three fizzing tablets (100 tablets for $4.99 from http://www.stevespanglerscience.com/), red/blue/yellow, into the water. Next we had the children mix the colors into the empty cups to make orange, green and purple. Finally we let them pour in a small amount of oil so they could see how the water and oil won’t mix.

For the second experiment, a weather experiment, we placed a scoop of insta-snow in large test tubes and let the kids mix the contents with water. The snow grows so fast that it pops out the top. Tammy explained how real snow was formed and then let them add the water and watch the magic. The product is Insta-snow and it is perfectly safe for kids to handle. (Insta-snow was $4.95 and the test tubes were $5.95 for six with a rack, both from www.stevespanglerscience.com)

For third experiment, Alex’s favorite, we chose buoyancy (upward force that allows large objects to float). For each child we set up:
- bowls filled half way with water (Rubbermaid bowls from the dollar store, 2 for $1),
- two equal size pieces of aluminum (roll for $1 from the Dollar Store), and
- 20 paper clips (pkg of 200 for $1 from the Dollar Store).
The kids put 10 paperclips on one piece of aluminum foil, balled it up and dropped it in. It sank. Then they folded the edges of the second piece of aluminum foil to make a small boat. They floated it on the top of the water and added 10 paperclips (one at a time or slowly). The lesson teaches that with more surface area the same weighted objects can float, just like large ships do on the sea.
And for the grand finale, a Mentos and Diet Coke geyser which was set off by my husband Steve while the rest of us stood far away! The reaction is instant and our geyser was about 20 feet in the air. (Mentos geyser tube from http://www.stevespanglerscience.com/ for $4.95). The kids loved it, but unfortunately I didn’t get a great picture of it because of all the commotion!

As I outlined in the part I post, I’ll share all the crafts, as well as our feature in Columbus Parent Magazine (now up!) shortly. Plus all of these items will be in the shoppe along with the invitations shortly. Thanks everyone for the lovely comments on the part I post too. I appreciate all the encouraging and sweet words more than you know!
Join The Celebration Shoppe on facebook, sign-up for the daily ideas to come right to your inbox (never miss an idea, giveaway or free printable!), follow us on twitter, pinterest and on instagram at @thecelebrationshoppe. And don’t forget to shop our birthday, baby shower and holiday party supplies!
 real parties: scientist part I