Valentine’s Day is only a few days away and I have the perfect Red Velvet Chocolate Cake recipe to share! Plus, I whipped up a super simple ruffle apron for my latest project with Jo-Ann Fabric and Craft Stores so you can look cute while you’re baking it!

First, pop over to Jo-Ann and get the ruffle apron tutorial (you can see just a hint of it to the left of the cake). Then, gather your cake ingredients. You’ll need:
- 2 1/2 cups cake flour, not self-rising (plus a little to coat your pans)
- 1 teaspoon Crisco
- 1 teaspoon salt
- 1/4 cup cocoa powder
- 1 1/2 cups sugar
- 1 1/2 cups canola oil
- 2 large eggs
- 1/4 cup red food coloring (you can add a bit more if you’d like the color to be more vibrant)
- 1 teaspoon pure vanilla extract
- buttermilk 1 cup, or you can use 3/4 cup soy milk if you have food allergies in your house
- 1 1/2 teaspoons baking soda
- 2 teaspoons white vinegar
- 2 cups Dark Chocolate Duncan Hines Frosting (I know… but not everything has to be from scratch!)
- wax paper
Now let’s get baking!
- Preheat and prep pans – Heat oven to 350 degrees. Generously grease (with Crisco… my grandmother preferred to butter) two 9-by-2-inch round cake pans. Sprinkle with flour, and tap out the excess and set the pans aside.
- Combine – In a medium bowl, whisk cake flour, salt, and cocoa; set aside.
- Wet ingredients – In the bowl of an electric mixer fitted with the paddle attachment, combine the sugar and oil, and beat on medium speed until well combined. Add eggs, one at a time, beating well after each addition. Add food coloring and vanilla, and beat until combined.
- Combine mixtures – Add 1/4 flour mixture and alternate with 1/4 wet mixture, scraping with a rubber spatula as needed to completely combine your batter.
- Add – In a small bowl, mix baking soda and vinegar until combined. Add to batter, and beat for 10 seconds.
- Divide – Evenly divide batter between the prepared pans.
- Bake 25 – 30 minutes – bake until a cake tester inserted in the center of each cake comes out clean.
- Cool – place pans on wire rack for five minutes to cool. Then, remove cake from pans, place on wire rack and allow them to continue to cool completely.
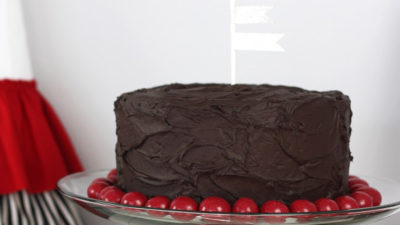
- Ice and decorate – place small strips of wax paper around the edge of the cake plate and place the first layer on top. Apply a thin crumb coat. Add a generous dollop of icing on top and smooth to edges. Add the second layer of cake and apply another thin crumb coat. Allow the icing to set. With a spatula, generously apply a coating of icing to the entire cake. Pull out the wax paper and decorate with red gumballs or malted milk balls. Both can be found at your local candy store.
- Cake topper – for a simple topper, use a lollipop stick and Darice glitter tape (the glitter won’t fall away). Wrap the tape around the top of the lollipop stick and cut small triangles out of the ends. Done!
Looking for more sweet treats for Valentine’s Day? These 5 Valentine’s Day Macaron recipes look so good! Or try my Valentine Heart You Cake or my Cherry Chocolate Cake Cobbler.
As always, I hope you’re inspired to craft, bake, create and celebrate!
INSTAGRAM | FACEBOOK | PINTEREST | GOOGLE+ | TWITTER | YOUTUBE | BLOGLOVIN
 Faux 5-Minute Cross-Stitch Cake Topper