I Scream, You Scream, We All Scream For Ice Cream! And summer! At my house we’re all screaming for summer too {grin}. I’m not sure who’s more excited, them or me. And as part of our kick-off to summer, we’re hosting an ice cream party!

A huge thank you to Cricut for sponsoring today’s ideas!
Ah… summer. Long lazy mornings, trips to the pool, hiking, catching fireflies, grilling… I could go on and on about the amazing plans we have. And before all the fun begins, we’re inviting friends over to gorge themselves on ice cream and maybe have a shaving cream fight and water balloon war in the yard. (You do remember that I have boys?!)
So in preparation for our fun, I took my Ice Cream Social printable collection (Ice Cream Social Invitation, Ice Cream Social Party Supplies, Ice Cream Social Thank You Note) and created a few additions: Ice Cream Parlor Awning Scallop, Awning Detail and Awning Poles, as well as “We All Scream For Ice Cream” typography. (I have a ton of ideas I’ll share for the typography, but I started with making it my party signage. Cute huh?!)

This Ice Cream Social backdrop can be whipped up in less than an hour with the Cricut Explore Air and a few craft supplies from Jo-Ann Fabric and Craft Stores.

Here’s what you’ll need:
- Cricut Explore Air (or Cricut Explore with bluetooth adapter, or the new Cricut One for a lower price point and all the fun)
- Cricut Design Space app for iPad® (or you can use your desktop/laptop if you don’t have an iPad)
- my Ice Cream Parlor project in Design Space (personalizing, resizing, etc. is so easy!)
- 12×24 Cricut Mat
- Cricut Vinyl (I used the new Light Blue and White)
- Cricut Transfer Tape
- Orange scrapbook paper, textured
- Optional: Ruler, level, pencil and painter’s tape
And here are the easy steps for creating your backdrop:
1. Measure – the first thing you have to do is decide how big you want your backdrop to be. I created individual scallops (that can be resized in Design Space) so you can make it as large or as small as you want. Mine are 6″ wide each, so it’s three feet across.
2. Cut – cut out all the shapes using your Cricut Air. You’ll notice that there is a blue pole and a white pole in the set-up, this is because I wanted to “group” them to make it easier to apply to the wall with transfer tape. You can ungroup them and change the color if you prefer a different way. I just found this easiest.
3. Tape a line – using painter’s tape, make a line on the wall for the top edge of the awning. I used a level because the last thing you want is to apply the vinyl, step back and realize you’re crooked. Trust me. I didn’t do it this time… but I’ve done it. {smirk}
4. Apply awning scallops – I didn’t use transfer tape for these because they’re pretty large, but I did use a ruler and my tape line.
5. Apply awning top design – use transfer tape to capture the design from the cutting mat. Measure center point (for me between the third and fourth scallop) and apply to wall. I also used the painter’s tape line as my bottom line.
6. Apply awning poles – use transfer tape to capture one 12″ length of pole. Measure and mark a straight line from the last scallop. (My pole pieces, if you don’t edit, are 2″ wide.) Apply the design. Weed out every other color and reapply to vinyl backer. Using ruler, measure center point between pole designs. Use ruler as a guide and apply the “other” color so that they alternate. (TIP: Place a piece of washi tape on your ruler so you don’t have to remeasure each time. You can just follow the tape line.)
7. Cut typography – I would have loved to have used vinyl for this element as well, but Cricut didn’t have orange vinyl at the time. (Now they do. Yay!) So I used paper. It still worked out great. Just cut and attach with a bit of tape or ZOTS. Both come off the wall fine.
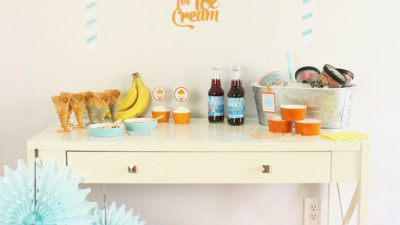
Now that we have our backdrop, let’s take a tour around the rest of the party!

I love these galvanized buckets. They’re perfect for cold treats like the ice cream for your banana split bar. (Note: The tags are part of my Ice Cream Social collection and can be personalized to say anything you like.)

For those of you that pop in to visit often, you know my youngest has severe food allergies. See that “Steve’s Chocolate Salty Caramel?” It’s dairy, egg and gluten free! Yep!! Just had to point that out. I can’t stand for little ones to be left out of parties. {wink}

Every party needs cake and how better than to whip up cupcakes. The topper is 3-D and the top is scalloped. A cinch to do with the Cricut Air! Plus, these cupcakes will fit perfectly in the little orange ice cream bowls. {wink}

Oh, and you can’t forget the ice cream sandwiches. These are minis and I heart them so. I feel less guilty about eating them you see. {smirk}

And of course everything is better with sprinkles!

If you don’t have a Cricut yet, I highly recommend it. There are thousands of images in Design Space and more being added everyday from designers like me. Designs that you can pull apart, layer, enlarge, make small, change the color, write on… the options and the creativity are endless. Trust me, you’ll love it.
Has the investment been an obstacle for you? Well I might have the answer. Did you see that Cricut just came out with the Explore One. It’s the same great machine, but a bit less expensive than the Cricut Explore (one step cut & write) and Cricut Explore Air (one step cut & write plus wireless). It’s the perfect starter machine because you can upgrade it if you want those other features. Compare all three machines and let’s get crafting.

From my family to yours, let’s kick summer off with some fun and have an ice cream party!! Jo-Ann Fabric and Craft Stores has everything you need!
As always, I hope you’re inspired to craft, bake, create and celebrate!
INSTAGRAM | FACEBOOK | PINTEREST | GOOGLE+ |TWITTER | YOUTUBE |

The Celebration Shoppe receives a form of compensation for ideas, styling and photography from time to time. All opinions expressed are genuine and not that of the sponsor. Kim would have it no other way!
 Countdown To The Last Day Of School