 This might be my favorite craft of recent months. While I was creating these, my boys were so excited they kept trying to sneak them from my craft table, which of course tells me that these fun stick ponies will be a great favor at any Wild West Cowboy bash. Here’s a list of what you’ll need:
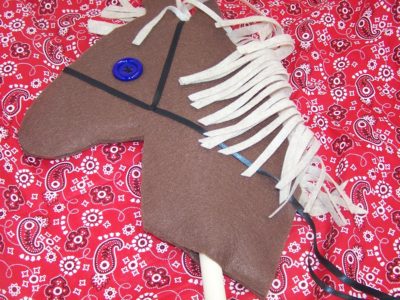
- ½ yard of brown felt
- 2 precut felt squares of complementary color
- ¼ yard of batting
- 2 large buttons
- Ribbon
- ¾ inch dowel
- Fabric glue
- Scissors
- Needle and thread
- Stick pony template (head, nose, neck); NOTE: Print each on 8 1/2 x 11 paper and piece together
And here are the super simple steps:
- Using the template (all three pieces), cut two shapes out of the brown felt and one out of the batting. (You’ll need to trim your batting about another ½ inch all the way around so that it easily tucks into your pony silhouette.)
- Determine where you want your button eyes and stitch them into place on both sides.
- To create the mane, use the curve of the pony’s head/neck as a guide and lay the precut felt square along the back of the pony’s neck so that it overlaps about an inch. This part of the felt will be tucked into the pony silhouette. Take your scissors and cut (shorter at the top and longer at the bottom) off a half moon shape on the right of the felt square. (You may have to trim the bottom off a bit more for the mane to end at the neck.) This should leave the shape of a pony’s mane. Now, cut thin strips, to resemble hair, all the way up the felt.
- For the top of the mane, use roughly a quarter of the second square of felt and lay it over the ears and forehead. Trim the felt in a curving motion allowing the mane on top of the pony’s head to be longer and to gradually get shorter on the forehead. Again, cut thin strips to resemble hair.
- To assemble the pony, tack the batting to one side of the pony with fabric glue and then tack the mane pieces into place. For the final pony silhouette, use a solid stream of glue around all edges except roughly an inch in the bottom where your dowel will be inserted. (TIP: If you get glue on the felt or if it spills over the edges, let it dry and then snip it off with your scissors.)
- For the bridal, select a thick ribbon and cut two pieces. One to go the length of the nose to the bottom of the neck and the second over the head between the ears. Apply the ribbon by tacking it into place with fabric glue.
Visit our shoppe to see all of our wild west decor including our custom invitation, complete with Texas Longhorns! And we would love to see your creativity. Please share with us at [email protected]. Happy crafting!
 wild west loot favor