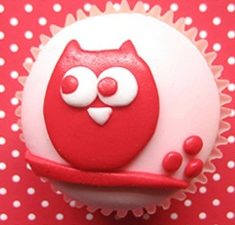
 How adorable are these owl cupcakes from Hello Naomi! They are perfect for our owl couple baby shower theme or for our owl fun sleepover birthday party theme with a few color tweaks.
Naomi doesn’t provide instructions, so I’m going to give you a few tips on how I think you can pull this one off without the use of fondant. Here’s what you’ll need:
- 1 white cake mix (don’t use the yellow of your eggs and bake them in white baking cups)
- 2 cans icing {cream cheese is my favorite!}
- Gel food coloring {the others are too watery in my opinion}
- 2 resealable bags
- 2 icing connectors
- #2, #3 and #6 icing tips
- Toothpicks
And here’s what you do:
- Bake your cupcakes so that you have a muffin top (filling the cups ¾ way full).
- While they cool, tint your icing. The image shows a light pink which works great for our owl fun sleepover birthday theme, but you might want a nice yellow for our owl couple baby shower theme… unless you want to show off the gender! {wink}
- Now, microwave your tinted icing in intervals of 7 seconds, stirring in between, until it is a little bit like soup. It will harden back up quickly so you’ll have to remicrowave it between every other cupcake or so.
- Take your cupcake and dip the muffin top in the icing, being careful not to get it on your baking cup. Slowly lift it out and spin the cupcake allowing the excess icing to drip off. Place it immediately on a cooling rack to allow the icing to dry. (Tip: If you have a little point in your icing where the last dripped off, quickly, and gently, shake your cupcake back and forth so that the icing will settle before it dries.)
- Now for the owl, tint a half can of icing the color you want your owl to be and set aside.
- Take a resealable bag, insert a connector and attach a #3 tip. Fill the bag with half of the tinted owl icing.
- Outline the shape of the owl on the cupcake.
- Change your tip to a #6 and pipe on your branch and dot leaves.
- Now to fill the owl, microwave the remaining icing, minus a heaping tablespoon for the eyes and noses, and carefully fill the owl outline. Smooth the icing to the edges with a toothpick. (Tip: Plastic icing bottles are great to control spilling, but you can do it with a spoon if you’re very careful.)
- Allow the owl to dry completely.
- For the outer eyes and nose, take another resealable bag with a connector and a #2 tip. Pipe your circles and triangles on each cupcake and then microwave the remaining icing to fill them in. Once dry, use the bag with the #6 tip and pipe the inner eyes.
For presentation, I love a tiered cake plate, but if you’re fresh out, buy some coordinating gift wrap tissue paper and line your serving tray. And if you have a pair of scalloped scissors to trim the edges, all the better.
Happy baking!
 cowboy boot birthday cake