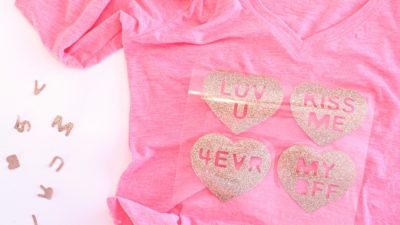
Valentine’s Day is around the corner and we all need something cute to wear, right?! I just love a cute graphic tee, so I whipped up a conversation heart shirt to wear to my kiddos’ class party. Want one? {grin}
It’s super easy. I ran to Target and picked up a long sleeve tee shirt, then dug through my Cricut iron-on rolls and found a remnant from when I made the Disney quote wall. Did you see it? With a few clicks in Cricut Design Space, a weeding tool and an iron… and I was wearing this cute Valentine’s tee in literally minutes.
To make this Valentine shirt, you’ll need:
- Pink tee (Target has them in long sleeve and short)
- Gold Glitter Cricut Iron On
- Weeding Tool
- Cricut Explore
- Light adhesive 12×12 mat
Super easy steps:
- Design – open this Cricut Design Space file. It’s sized for my t-shirt, but depending on the cut of your shirt you may want to lay your shirt flat, measure it across, divide it to find your center point, and determine if you’d like the image larger or smaller.
- Mat – apply the iron on, liner side down, to mat
- Cut – read the directions on the package, but make sure that you absolutely “Mirror-Image” your cut or you’ll need to look in a mirror to read it. {wink}
- Weed – weed out all the iron-on that isn’t your image.
- Iron – iron your shirt to heat up the fabric, place the image with liner on top, iron in 15 second intervals. Glitter takes a bit more heat to apply than regular iron-on so test. Also a good idea to flip the shirt and iron the back too just to make sure it’s all set. Take your time!
Want to shop this project right now? Here’s everything you’ll need:
[show_lookbook_widget id=”264491″]
Make sure you hop over to see some of my other DIY tshirt crafts: Proud To Be An American Tshirt, Shine Bright Tshirt, and Makers Gonna Make Tshirt!
As always, I hope you’re inspired to craft, bake, create and celebrate!


 Valentine’s Day Ideas – Heart Balloon Wall & Date Night Game Ideas